Sunday, August 29, 2010

A handkerchief for your bride...

I just finished and posted my favorite handkerchief yet -- a pretty lace bridal handkerchief with nesting love birds in grey.


I've actually done three handkerchiefs in the past year with this same design, but always used blue for the birds. I decided to use grey this time because I wanted the birds to look like mourning doves.

Mourning doves are a very well-known species because of their unique cooing, which sounds like someone crying, as well as their popularity as a game bird. My favorite story about these birds is that they mate for life; once they select a mate, that's it. They are a common symbol of love and faithfulness, so I think they are a particularly good choice for wedding items!

I actually have a tattoo of a mourning dove on my left arm-- I guess you could say I'm a fan!


Saturday, August 21, 2010

Hoop Mounted Wall Art -- 50% Off in my Etsy shop

I've decided to put all my hoop mounted wall art on clearance, 50% off. I love these pieces, but I am not planning to do any more hoop mounted art. I like the idea, but I am much more into functional embroidered art.

Follow this link for the listings on Etsy. There are several more pictures on Etsy of each piece.

Once these listings expire I will not be relisting these pieces.


Saturday, August 14, 2010

Embroidery Find of the Week- Cross-Stitch Buttons from DeepIndigo

DeepIndigo on Etsy makes the cutest little cross-stitched buttons, like this set, which features fruit:

I don't like doing cross-stitch myself and it often turns out looking like something a granny with bad taste would have in her powder room. DeepIndigo's buttons manage to look fresh and cute, though! I can imagine these as replacement buttons on a vintage blouse or dress, or as focal points as a plain tote bag.


Wednesday, August 11, 2010

Bridesmaids' Initial Handkerchiefs -- In Action!


The lovely Christinare from Etsy recently sent me some pictures of her wedding handkerchiefs in action!

The only thing I enjoy more than making wedding handkerchiefs is seeing the bridesmaids (or other members of the bridal party) using them!

Monday, August 2, 2010

Embroidery on Black Fabric: Tutorial

I recently completed a fairly large set of embroidered floral motifs on black fabric, so I decided to work up a tutorial.

It's actually easier than it seems-- You'll need a ballpoint pen or tracing stylus, white transfer paper, pins, and (optional) clear tape.

The process is pretty basic-
1. Make a copy of your pattern.
2. Position it on your fabric, face up with the transfer paper underneath it, and pin it in place.
3. Trace over it, bearing down hard enough to make a mark on the paper.
4. Stitch!

Read on for more detail and photos.

First of all, make a copy of your pattern that you're willing to basically destroy. Trace it, scan it in your computer and print it, go to Kinko's and make a copy... You want it to be actual size. Don't reverse fonts.

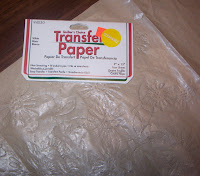
Select a piece of WHITE TRANSFER PAPER in the size of your design. I LOVE this Sullivans Quilter's Choice, but apparently they don't make it anymore. DMC's transfer paper rubs off very easily, but Dritz dressmaker's carbon works well. I haven't tried Jenny Hart's transfer paper as her supplies tend to be higher cost than their counterparts at other needlework supply companies.


(OPTIONAL) Tape the transfer paper to the pattern, along the top and bottom edges and wrong sides together, so that you can more easily position the design. (You can skip this step and just slide the transfer paper under the pattern as well. This step is helpful when the placement of the design is important).

Now, position your pattern and lay it transfer paper side down onto your black fabric. I strongly recommend pinning the pattern/paper to the fabric to avoid shifting. You could also use pattern weights, but pins work for me!

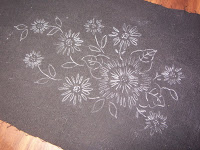
With a ball point pen or tracing stylus, trace over the entire pattern. It takes a little bit of practice to get the right pressure, but you're aiming for the amount of pressure you might need to sign something in triplicate. Many sites recommend a tracing stylus, but I don't see the necessity of buying one. I just use a ball point pen. Iactually use the pen WITH the ink in it so I can see where I've traced and where I haven't... I recommend using an old dry pen if you use this method on any fabric other than black, as you may poke through the fabric and mark it with the ink. My patterns look like this when I'm finished-- the other side becomes a raised up reverse of the front.


After you've traced over the entire pattern, your fabric should look something like this:

Now, hoop it up and starting stitching!

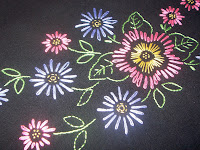
You'll end up with beautiful stitching on black:


I went on vacation!

But, I have returned! Back and better than ever...

Here are few things I've been working on...

Black fabric embroidered panels for Kim (tutorial on how to embroider on black fabric coming soon!)
Angel wings Onesie for Johanna... This turned out SO cute!
Extra special wedding handkerchiefs for Julia... One for her mother and one for her soon to be mother-in-law. We used her wedding colors for the flowers and the initials. I love this vintage floral embroidery design-- I stitched one in shades of pink and decided to put my own name on it! I needed a new hankie...